
Setting Up Your Dream Home Studio: A Practical Guide to Digital Audio Workstations
For music lovers seeking to create their own home recording studio, setting up a Digital Audio Workstation (DAW) can seem daunting. But with theautonomics.com’s guide, you’ll discover that building your own personal space for musical creation is achievable and incredibly rewarding. This guide provides practical advice and assistance to get you started on your journey to mastering your own Digital Audio Workstation at home.
Explore
- 1 Choosing Your Digital Audio Workstation (DAW)
- 2 Essential Hardware for Your Home Studio Setup
- 3 Setting Up Your Digital Audio Workstation at Home: Software and Configuration
- 4 Optimizing Your Digital Audio Workstation at Home Environment
- 5 Expanding Your Digital Audio Workstation at Home Setup
- 6 Troubleshooting Common Issues
Choosing Your Digital Audio Workstation (DAW)
The first crucial step in setting up your home studio is selecting the right Digital Audio Workstation. Many excellent DAWs cater to various skill levels and budgets. Consider factors like ease of use, features, and compatibility with your existing hardware when making your choice. Popular options include Ableton Live, Logic Pro X, Pro Tools, FL Studio, and Cubase. Researching reviews and comparing features will help you find the perfect Digital Audio Workstation for your needs. Remember, the best Digital Audio Workstation at home is the one that best suits your workflow and creative style.
Understanding Your Needs
Before diving into specific DAWs, assess your musical goals. Are you a beginner looking for a user-friendly interface, or a seasoned professional needing advanced mixing and mastering capabilities? A simple Digital Audio Workstation might suffice for basic recording and editing, while more complex projects will require a more powerful and feature-rich option. This careful consideration will streamline the process of setting up your Digital Audio Workstation at home.
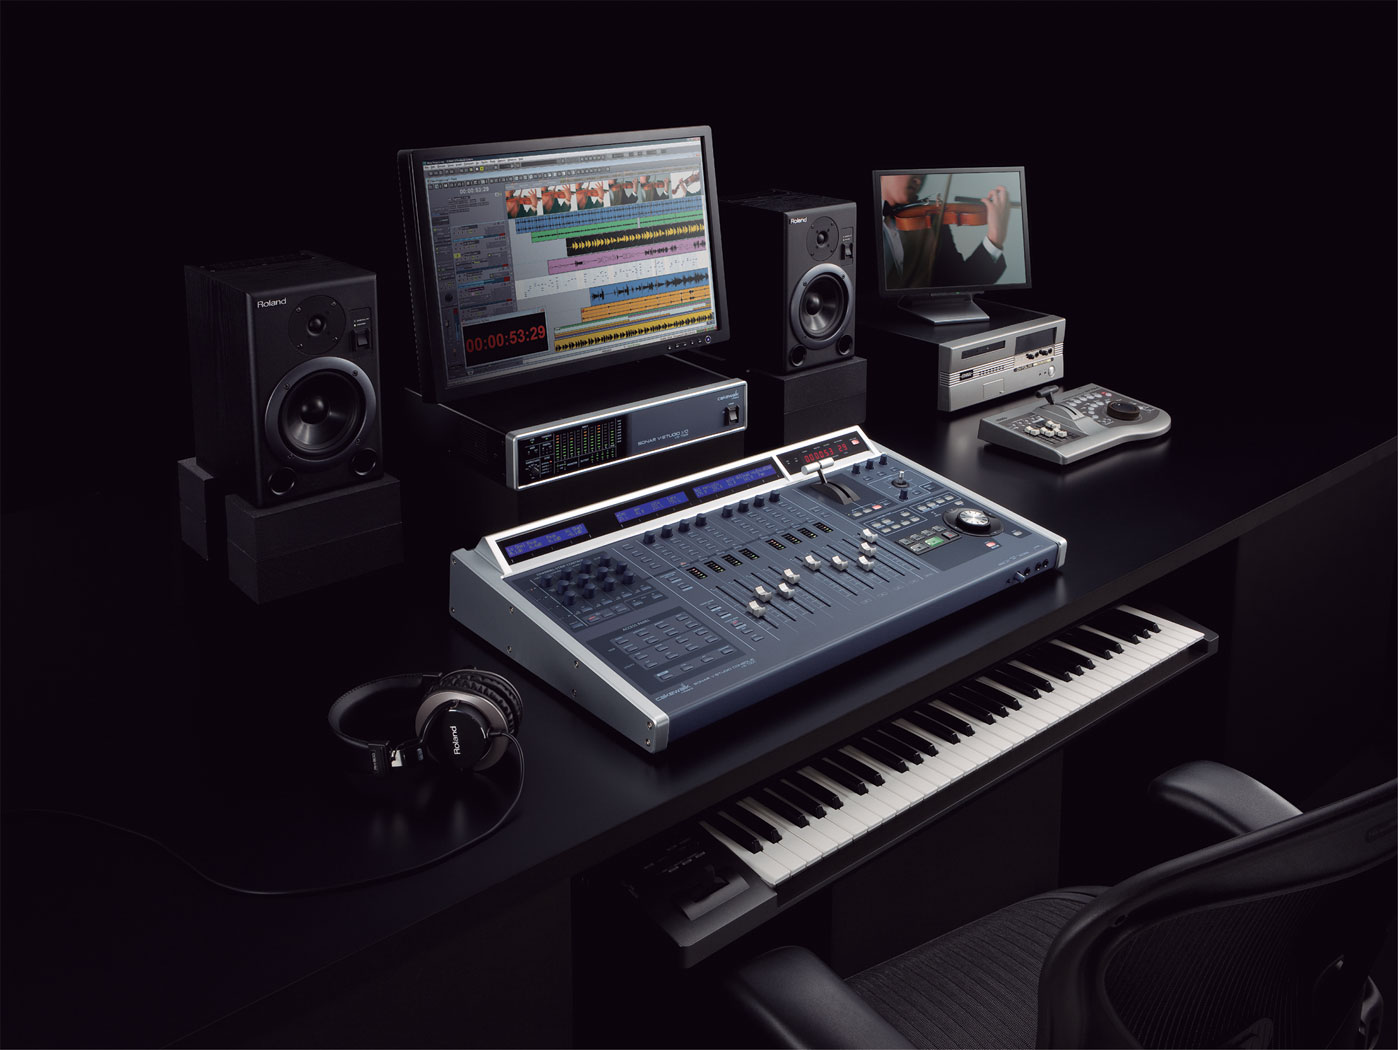
Essential Hardware for Your Home Studio Setup
Once you’ve chosen your Digital Audio Workstation, it’s time to gather the necessary hardware. This isn’t about acquiring the most expensive equipment; it’s about selecting tools that meet your current needs and allow for future expansion. A solid foundation in your Digital Audio Workstation at home setup is key.
Audio Interface
An audio interface is essential for connecting your microphones, instruments, and headphones to your computer. It converts analog signals from your instruments into digital signals that your DAW can understand. Choose an interface with enough inputs and outputs to accommodate your current and future needs. Consider factors like the quality of its preamps and its latency (the delay between playing an instrument and hearing it back). Investing in a quality audio interface will significantly improve the sound quality of your recordings in your Digital Audio Workstation at home.
Microphones

The type of microphone you choose will depend on the instruments you plan to record. Condenser microphones are excellent for capturing delicate sounds like vocals and acoustic instruments, while dynamic microphones are more durable and suitable for louder instruments like drums and guitars. Start with one or two good quality microphones and expand your collection as your needs grow, enhancing your Digital Audio Workstation at home setup.
Headphones
Closed-back headphones are crucial for monitoring your recordings without leaking sound into your microphone. Open-back headphones offer a more natural sound but are not ideal for recording due to sound leakage. Choose comfortable headphones that provide accurate sound reproduction, critical for your Digital Audio Workstation at home workflow.
Monitors (Optional, but Recommended)
While headphones are essential, studio monitors provide a more accurate representation of your mix. They allow you to hear your music as it will sound on other systems, a crucial aspect of a professional Digital Audio Workstation at home.

Computer
Your computer is the heart of your Digital Audio Workstation at home. Ensure it meets the minimum system requirements of your chosen DAW and has sufficient processing power and RAM to handle your projects without lagging. A fast processor and ample RAM are crucial for smooth operation.
Setting Up Your Digital Audio Workstation at Home: Software and Configuration
After acquiring your hardware, you need to install and configure your DAW and other necessary software. This phase involves connecting your equipment, setting up your audio interface, and configuring your DAW’s preferences. Getting your Digital Audio Workstation at home up and running efficiently is key to your productivity.
Installing the DAW
Download and install your chosen DAW according to the manufacturer’s instructions. This process is usually straightforward and involves following a series of on-screen prompts. Familiarize yourself with the DAW’s interface and basic functions before moving on to more complex settings. Your Digital Audio Workstation at home is now ready for configuration.
Connecting Your Hardware
Connect your audio interface to your computer using USB or Thunderbolt cables. Then, connect your microphones, instruments, and headphones to the audio interface. Make sure all connections are secure and properly configured. A well-connected Digital Audio Workstation at home is crucial for avoiding issues during recording.
Setting Up Your Audio Interface
Configure your audio interface’s settings using the provided software or control panel. This usually involves selecting the correct sample rate and buffer size. The sample rate determines the quality of your audio, while the buffer size affects the latency. Experiment with different settings to find the optimal balance between quality and performance in your Digital Audio Workstation at home.
Configuring Your DAW
Once your hardware is connected and configured, you can start setting up your DAW’s preferences. This includes setting up your audio input and output devices, creating new projects, and configuring your MIDI settings. Take your time and explore the various settings to personalize your Digital Audio Workstation at home.
Optimizing Your Digital Audio Workstation at Home Environment
The environment in which you work significantly impacts your productivity and creativity. A well-organized and acoustically treated space will greatly improve your recording experience. Optimizing your Digital Audio Workstation at home environment is crucial for a productive workflow.
Acoustic Treatment
Acoustic treatment helps to minimize unwanted reflections and resonances in your recording space. This can involve using acoustic panels, bass traps, and diffusers to absorb and scatter sound waves. Proper acoustic treatment dramatically improves the sound quality of your recordings using your Digital Audio Workstation at home.
Organization
A clean and organized workspace promotes focus and efficiency. Keep your cables tidy, your equipment organized, and your desk clutter-free. This will make it easier to find what you need and prevent accidental damage to your equipment. A well-organized Digital Audio Workstation at home setup is vital for a smooth workflow.
Ergonomics
Setting up your workstation ergonomically is vital for preventing fatigue and injury. Ensure your chair is comfortable, your monitor is at eye level, and your keyboard and mouse are within easy reach. A comfortable and ergonomic Digital Audio Workstation at home ensures long and productive sessions.
Expanding Your Digital Audio Workstation at Home Setup
As you gain experience and your projects become more complex, you might need to expand your Digital Audio Workstation at home setup. This could involve adding more microphones, instruments, or software plugins. Continuous improvement is part of the journey.
Software Plugins
Software plugins can add a wide range of effects and instruments to your DAW. These plugins can help you achieve professional-sounding mixes and create unique sounds. Experiment with different plugins to find those that fit your style and needs. Expanding your plugin collection enhances your Digital Audio Workstation at home capabilities.
Instruments
Adding more instruments to your setup expands your creative possibilities. Whether it’s a new keyboard, guitar, or drum machine, each addition brings new sonic textures to your projects. Choose instruments that inspire you and complement your existing setup in your Digital Audio Workstation at home.
Monitoring Upgrades
As your skills improve, you might consider upgrading your monitoring system to better reflect the nuances of your mixes. Better monitors allow for more precise mixing and mastering. Upgrading your Digital Audio Workstation at home monitoring system allows for more accurate sound reproduction.
Troubleshooting Common Issues
Even with careful planning, you might encounter some issues while setting up your Digital Audio Workstation at home. This section addresses some common problems and their solutions, aiding your Digital Audio Workstation at home setup.
Latency Issues
Latency is the delay between playing an instrument and hearing it back. High latency can make it difficult to play in time. Adjusting the buffer size in your audio interface settings can often resolve this issue. Understanding and resolving latency issues is crucial for your Digital Audio Workstation at home.
Driver Issues
Driver issues can prevent your audio interface from working correctly. Ensure you have the latest drivers installed from the manufacturer’s website. Outdated drivers are a common cause of problems in your Digital Audio Workstation at home setup.
Software Conflicts
Software conflicts can cause your DAW to crash or malfunction. Make sure all your software is compatible and up to date. Regular software updates are essential for a stable Digital Audio Workstation at home environment.
Conclusion
Setting up your own Digital Audio Workstation at home is a rewarding journey that blends technical expertise with creative expression. By following this guide, you’ll gain the confidence and knowledge to create a functional and inspiring workspace for your musical endeavors. Remember, the process is iterative; start with the essentials, gradually expand your setup, and most importantly, enjoy the creative process. Your personal Digital Audio Workstation at home awaits!